Tutoriel Astro
Install node.js
Section titled “Install node.js”apt install -y curlcurl -fsSL https://deb.nodesource.com/setup_22.x -o nodesource_setup.shbash nodesource_setup.shapt install -y nodejsnode -vSource : https://github.com/nodesource/distributions/blob/master/DEV_README.md$
Initialiser le projet Astro
Section titled “Initialiser le projet Astro”Source : https://docs.astro.build/en/tutorial/0-introduction/
npm create astro@latestRépondre y, ./tutorial (ou un autre nom de dossier), choisir le template, y pour les dépendances, y pour git.
Dans le répertoire taper code . pour lancer vscode, attention, il faut avoir installé le plugin wsl dans vscode.
Démarrer le serveur
Section titled “Démarrer le serveur”npm run dev# lancer depuis WSL si WSLVoir la page sur http://localhost:4321.
De là elle se mettra à jour en live.
Si l’accès depuis l’hôte (et que le serveur npm est sur WSL) à la page web ne fonctionne pas :
Sur WSL, vérifier que le port est en écoute avec 0.0.0.0 et non 127.0.0.1 :
ss -lntp | grep 4321# si LISTEN 0 511 127.0.0.1:4321 0.0.0.0:* ce n'est pas bon# si LISTEN 0 511 0.0.0.0:4321 0.0.0.0:* alors ok# on peut alors y accéder par ip_WSL:4321 depuis l'hôte.Si c’est sur 127.0.0.1 alors lancer cette commande à la place :
npm run dev -- --host 0.0.0.0 --port 4321Premières modifications
Section titled “Premières modifications”Éditer le fichier src/pages/index.astro.
Mettre le dépot sur github, via VS Code
Section titled “Mettre le dépot sur github, via VS Code”Dans l’onglet source control de VS code, clique sur init pour initialiser le projet.
Cliquer sur les 3 points au dessus du bouton Commit → Remote → Add Remote et mettre le lien SSH du repository créé en amont sur github.
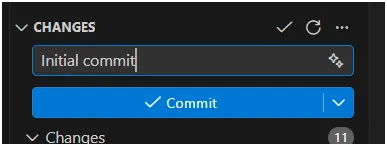
Remplir le message en haut (Initial Commit par exemple) puis cliquer sur commit :
S’il nous demande de faire un stage de tous les changements choisir “Always”.
S’il y a une erreur à propos du nom et de l’adresse email non initialiser :
git config --global user.name "Your Name"git config --global user.email "your.email@example.com"Puis cliquer sur “Publish” .
Si erreur parce le git existe déjà (⚠️ uniquement si on peut remplacer tout ce qui existe sur le repository coté github) :
git push --force-with-lease astro main
Mettre en ligne : netlify
Section titled “Mettre en ligne : netlify”Permet de synchroniser le github et de mettre à jour un site directement depuis github.
VS Code → Github → Netlify
Créer le site
Section titled “Créer le site”Les fichiers .astro représentent des pages sur site web.
Créer un fichier about.astro dans src/pages.
Copier le code de index.astro.
Variables simple
Section titled “Variables simple”---const pageTitle = "About Me";---
<html lang="en"> <head> <meta charset="utf-8" /> <link rel="icon" type="image/svg+xml" href="/favicon.svg" /> <link rel="icon" href="/favicon.ico" /> <meta name="viewport" content="width=device-width" /> <meta name="generator" content={Astro.generator} /> <title>{pageTitle}</title> </head> <body style="background-color: #161616; font-family: Arial, sans-serif; color: #e1dada;"> <a href="/">Home</a> <a href="/blog/">Blog</a> <a href="/about/">About</a> <h1>{pageTitle}</h1> <h2>... and my new Astro site!</h2> <p>I am working through Astro's introductory tutorial. This is the second page on my website, and it's the first one I built myself!</p> <p>This site will update as I complete more of the tutorial, so keep checking back and see how my journey is going!</p> </body></html>Entre les --- , on peut définir des variables qu’on peut en suite passé dans le code avec {var} .
Listes
Section titled “Listes”---const pageTitle = "About Me";
const identity = { firstName: "Sarah", country: "Canada", occupation: "Technical Writer", hobbies: ["photography", "birdwatching", "baseball"],};
const skills = ["HTML", "CSS", "JavaScript", "React", "Astro", "Writing Docs"];---
<html lang="en"> <head> <meta charset="utf-8" /> <link rel="icon" type="image/svg+xml" href="/favicon.svg" /> <link rel="icon" href="/favicon.ico" /> <meta name="viewport" content="width=device-width" /> <meta name="generator" content={Astro.generator} /> <title>{pageTitle}</title> </head> <body style="background-color: #161616; font-family: Arial, sans-serif; color: #e1dada;"> <a href="/">Home</a> <a href="/blog/">Blog</a> <a href="/about/">About</a> <h1>{pageTitle}</h1> <h2>... and my new Astro site!</h2> <p>I am working through Astro's introductory tutorial. This is the second page on my website, and it's the first one I built myself!</p> <p>This site will update as I complete more of the tutorial, so keep checking back and see how my journey is going!</p> <p>Here are a few facts about me:</p> <ul> <li>My name is {identity.firstName}.</li> <li>I live in {identity.country} and I work as a {identity.occupation}.</li> {identity.hobbies.length >= 2 && <li>Two of my hobbies are: {identity.hobbies[0]} and {identity.hobbies[1]}</li> } </ul> <p>My skills are:</p> <ul> {skills.map((skill) => <li>{skill}</li>)} </ul> </body></html>En résumé dans la partie HTML :
{identity.hobbies.length >= 2 &&  <li>Two of my hobbies are: {identity.hobbies[0]} and {identity.hobbies[1]}</li>}
<ul>  {skills.map((skill) => <li>{skill}</li>)}</ul>
Conditions
Section titled “Conditions”---const happy = true;const finished = false;const goal = 3;---
{happy && <p>I am happy to be learning Astro!</p>} {finished && <p>I finished this tutorial!</p>} {goal === 3 ? <p>My goal is to finish in 3 days.</p> : <p>My goal is not 3 days.</p>}Style & CSS avec variables, sur une seule page
Section titled “Style & CSS avec variables, sur une seule page”Passer des variables dans les balises css style :
---const skillColor = "crimson";const fontWeight = "bold";const textCase = "uppercase";---
<style define:vars={{skillColor, fontWeight, textCase}}>    h1 {        color: purple;        font-size: 4rem;        text-transform: var(--textCase);    }    .skill {        color: var(--skillColor);        font-weight: var(--fontWeight);    }</style>
Style & CSS avec variables globales
Section titled “Style & CSS avec variables globales”Créer un fichier global.css dans le dossier src/styles/.
html {  background-color: #f1f5f9;  font-family: sans-serif;}
body {  margin: 0 auto;  width: 100%;  max-width: 80ch;  padding: 1rem;  line-height: 1.5;}
* {  box-sizing: border-box;}
h1 {  margin: 1rem 0;  font-size: 2.5rem;}
Et entre les --- des pages mettre :
---import '../styles/global.css';---Astro Components
Section titled “Astro Components”Créer un dossier src/components/.
Créer un menu
Section titled “Créer un menu”Y créer un fichier Navigation.astro :
------<a href="/">Home</a><a href="/about/">About</a><a href="/blog/">Blog</a>Exemple d’intégration dans la page index.astro :
---import Navigation from '../components/Navigation.astro';import '../styles/global.css';
const pageTitle = "Home Page"---
<html lang="en">  <head>    <meta charset="utf-8" />    <link rel="icon" type="image/svg+xml" href="/favicon.svg" />    <link rel="icon" href="/favicon.ico" />    <meta name="viewport" content="width=device-width" />    <meta name="generator" content={Astro.generator} />    <title>{pageTitle}</title>  </head>  <body>    <Navigation />    <h1>Le site web de Denis</h1>  </body></html>
Résumé des modifications :
---import Navigation from '../components/Navigation.astro';---
  <body>    <Navigation />  [...]
Créer un footer
Section titled “Créer un footer”Fichier : src/components/Footer.astro :
---const platform = "github";const username = "withastro";---
<footer>  <p>Learn more about my projects on <a href={`https://www.${platform}.com/${username}`}>{platform}</a>!</p></footer>
Mettre <Footer /> avant la balise de fermeture </body> sur les différentes page (et importer le Footer tout haut comme pour le menu principal.
Créer un composant pour les comptes sociaux
Section titled “Créer un composant pour les comptes sociaux”Fichier src/components/Social.astro :
---const { platform, username } = Astro.props;---<a href={`https://www.${platform}.com/${username}`}>{platform}</a>On importe ce composant dans le composant Footer :
---import Social from './Social.astro';---
<footer>    <Social platform="github" username="denis" />    <Social platform="linkedin" username="digitalthink" />    <Social platform="youtube" username="dionis501" /></footer></footer>
On fait un Header
Section titled “On fait un Header”Fichier src/components/Header.astro où l’on importe Navigation :
---import Navigation from './Navigation.astro';---<header> <nav> <Navigation /> </nav></header>Sur les pages, on remplace Navigation par Header et on importe Header au lieu de Navigation.
On ajoute du style responsive
Section titled “On ajoute du style responsive”On met à jour Navigation.astro :
------<div id="main-menu" class="nav-links"> <a href="/">Home</a> <a href="/about/">About</a> <a href="/blog/">Blog</a></div>On modifie le fichier global.css :
html {  background-color: #f1f5f9;  font-family: sans-serif;}
body {  margin: 0 auto;  width: 100%;  max-width: 80ch;  padding: 1rem;  line-height: 1.5;}
* {  box-sizing: border-box;}
h1 {  margin: 1rem 0;  font-size: 2.5rem;}
/* nav styles */
.nav-links {  width: 100%;  display: none;  margin: 0;}
.nav-links a {  display: block;  text-align: center;  padding: 10px 0;  text-decoration: none;  font-size: 1.2rem;  font-weight: bold;  text-transform: uppercase;  color: #0d0950;}
.nav-links a:hover,.nav-links a:focus {  background-color: #ff9776;}
@media screen and (min-width: 636px) {  .nav-links {    margin-left: 5em;    display: block;    position: static;    width: auto;    background: none;  }
  .nav-links a {    display: inline-block;    padding: 15px 20px;  }}
Script pour ouvrir un menu
Section titled “Script pour ouvrir un menu”Fichier src/components/Menu.astro :
<button aria-expanded="false" aria-controls="main-menu" class="menu"> Menu</button>On place <Menu /> juste avant <Navigation /> dans Header.astro (on oublie pas d’importer Menu).
On modifie global.css , en ajoutant :
.menu {  background-color: #0d0950;  border: none;  color: #fff;  font-size: 1.2rem;  font-weight: bold;  padding: 5px 10px;}
:has(.menu[aria-expanded="true"]) .nav-links {  display: unset;}
/* et dans @media screen and (min-width: 636px) { ajouter : */  .menu {    display: none;  }
On ajoute le code suivant (Typescript) sur index, juste après <Footer /> :
<script>    const menu = document.querySelector('.menu');
    menu?.addEventListener('click', () => {      const isExpanded = menu.getAttribute('aria-expanded') === 'true';      menu.setAttribute('aria-expanded', `${!isExpanded}`);    });</script>
Mais il vaut mieux mettre le code dans un fichier .js, src/scripts/menu.js :
const menu = document.querySelector('.menu');
menu?.addEventListener('click', () => {  const isExpanded = menu.getAttribute('aria-expanded') === 'true';  menu.setAttribute('aria-expanded', `${!isExpanded}`);});
Et on remplace le script dans index.astro par :
<script> import "../scripts/menu.js";</script>Les Layouts
Section titled “Les Layouts”On créé un fichier : src/layouts/BaseLayout.astro.
On y met le code complet de la page index.astro.
Puis on modifie la page index.astro comme suit :
---import BaseLayout from '../layouts/BaseLayout.astro';const pageTitle = "Home Page";---<BaseLayout> <h2>My awesome blog subtitle</h2></BaseLayout>Dans l’état actuel rien ne change. Il faut encore modifier le BaseLayout.astro en rajoutant une balise <slot /> :
[...]<h1>{pageTitle}</h1><slot />[...]Il faut encore changer dans BaseLayout.astro la gestion de la variable pageTitle, dont la page doit être la source de la variable et non le Layout :
/* remplacer : */const pageTitle = "Home Page"/* par : */const { pageTitle } = Astro.props;Et modifier la balise BaselLayout comme cela dans index.astro :
---import BaseLayout from '../layouts/BaseLayout.astro';const pageTitle = "Home Page";---<BaseLayout pageTitle={pageTitle}> <h2>My awesome blog subtitle</h2></BaseLayout>Cela permet de passer une variable dans le layout.
Enfin sur les autres pages, notamment la page about me dont le titre est en rose, il faut conserver la balise style, la déplacer entre les balise <BaseLayout> et ajouter is:global à la balise style pour que le css puisse atteindre h1 qui provient de BaseLayout :
---import BaseLayout from "../layouts/BaseLayout.astro";const pageTitle = "About Me";
const identity = {    firstName: "Sarah",    country: "Canada",    occupation: "Technical Writer",    hobbies: ["photography", "birdwatching", "baseball"],};
const skills = ["HTML", "CSS", "JavaScript", "React", "Astro", "Writing Docs"];
const happy = true;const finished = false;const goal = 3;
const skillColor = "crimson";const fontWeight = "bold";const textCase = "uppercase";---
<BaseLayout pageTitle={pageTitle}>    <style is:global define:vars={{ skillColor, fontWeight, textCase }}>        h1 {            color: purple;            font-size: 4rem;            text-transform: var(--textCase);        }        .skill {            color: var(--skillColor);            font-weight: var(--fontWeight);        }    </style>
    <p>        I am working through Astro's introductory tutorial. This is the second        page on my website, and it's the first one I built myself!    </p>    <p>        This site will update as I complete more of the tutorial, so keep        checking back and see how my journey is going!    </p>    {happy && <p>I am happy to be learning Astro!</p>}    {finished && <p>I finished this tutorial!</p>}    {        goal === 3 ? (            <p>My goal is to finish in 3 days.</p>        ) : (            <p>My goal is not 3 days.</p>        )    }    <p>Here are a few facts about me:</p>    <ul>        <li>My name is {identity.firstName}.</li>        <li>            I live in {identity.country} and I work as a {identity.occupation}.        </li>        {            identity.hobbies.length >= 2 && (                <li>                    Two of my hobbies are: {identity.hobbies[0]} and{" "}                    {identity.hobbies[1]}                </li>            )        }    </ul>    <p>My skills are:</p>    <ul>        {skills.map((skill) => <li class="skill">{skill}</li>)}    </ul></BaseLayout>